| F355 HOME |
Ferrari F355 Improvements & Detailing |
DETAILING | ||
| 'THE CAR' | MODIFICATIONS | |||
To return to Garvin's Motoring World Portal click on either of the Ferrari logos above |
||||
| F355 HOME |
Ferrari F355 Improvements & Detailing |
DETAILING | ||
| 'THE CAR' | MODIFICATIONS | |||
To return to Garvin's Motoring World Portal click on either of the Ferrari logos above |
||||
Well it didn't take long but shortly after acquring the vehicle the improvement and 'detailing' started to bring the F355 up to a standard that I will be happy with ............ which probably means it will never achieve such a heady height but, nevertheless, it should inexorably improve over time. This page details the various 'improvements' in the order they were undertaken. |
 |
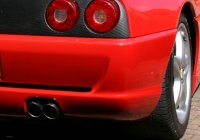 |
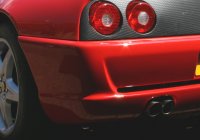
July 2012 : The rear bumper was misaligned after the Tubi exhaust was fitted and had started to 'ripple' over the mounting plates on both the nearside and, in particular, the offside. It also had some cracking around the offside exhaust outlet cut out. The bumper was removed, repaired, re-painted and re-fitted and now looks as good as new. |
 |
 |
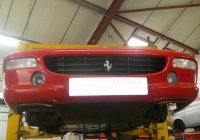
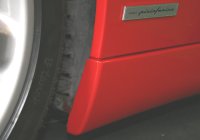
August 2012 : The front bumper was in relatively good condition where it could be seen but had some severe scraping underneath. The bumper was removed, repaired, re-painted, including all the black behind the grill and grill itself, and re-fitted. Black polyurethane scuff panels were then fitted to keep future damage to a minimum.The inside edges of the front wheel arches were also re-painted at this time. |
 |
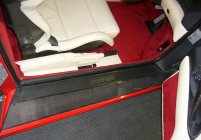 |
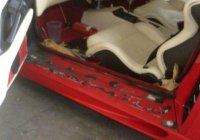
August 2012 : The original steel door sill kick panels had just begun to corrode and bubble. These were replaced with carbon fibre kick panels and the original rubber inserts transplanted into them. |
 |
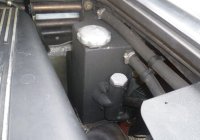 |
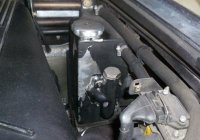
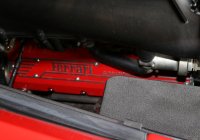
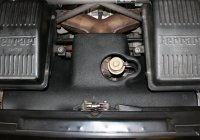
August 2012 : The paint on the oil header tank in the engine bay was peeling and looked decidedly tatty - it appears that the tank was not prepared/primed properly in the first place. The tank was removed, stripped, prepared, re-painted in authentic crackle black finish and re-fitted. Whilst removed it became apparent that the right hand radiator was on its last legs so was replaced as well. Whilst in the engine bay the 'weak' engine cover struts were also renewed. |
 |
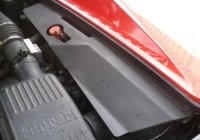 |
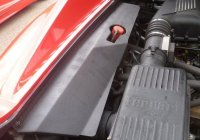
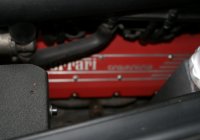
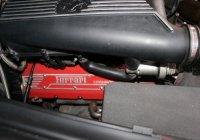
August 2012 : The paint on the engine bay lateral protection panels had also started to peel so these were removed, stripped, prepared, re-painted (again in authentic crackle black finish) and re-fitted. The original information plates fitted to the right hand panel were missing from a previous owner's refurbishment - sourcing replacements is proving difficult. |
 |
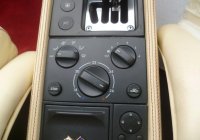 |
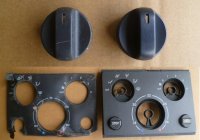
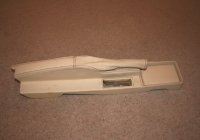
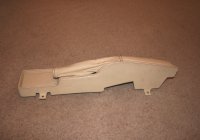
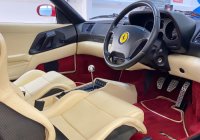
August 2012 : The air conditioning panel and switches within the centre console had gone rubbery and sticky with the panel beginning to bubble and lift. The panel was replaced with a new cover panel (temperature in degC) and the switch gear cleaned up. Looks and feels much nicer. |
 |
 |
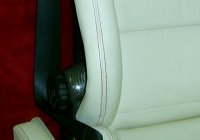
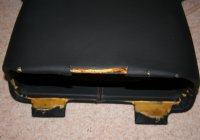
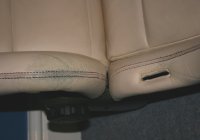
August 2012 : The driver's seat and squab bolsters had scuffed. These bolsters were thoroughly cleaned and then re-dyed using a Gliptone (Liquid Leather) Crema Scuff Master kit and then the whole interior leather trim thoroughly cleaned and conditioned. The worn decorative red stitching was 'touched in' using dark red permanent ink. The results are very good but we'll see how long they last - in time it may need the panels completely re-trimming. |
 |
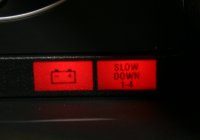 |
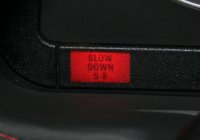
September 2012 : The catalytic converter thermocouple/slow down system had been disconnected and the warning lamp bulbs removed from the dash - probably because it is a notoriously unreliable system prone to failing and shutting down a bank of the engine for no good reason. This system was re-connected and tested to warn of any potential overheating problems |
 |
 |
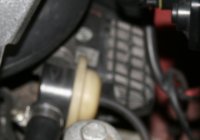
September 2012 : The start up air injection system decided to work intermittently. Although not critical to engine performance, the system was 'overhauled' to get it back to 'rude health'. The exhaust by-pass valve had been wired open. Although producing a wonderful noise at low revs and creating minimal back-pressure, it does result in the car being a bit too noisy at low speeds for the neighbours and possibly the MoT. The valve was freed and tested with a resulting more 'acceptable' low rev/speed exhaust note. The glorious high rev/speed exhaust note remains of course! |
 |
 |
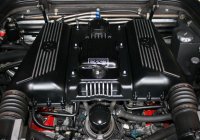
June 2013 : Cam covers were weeping a little oil and in dire need of a spruce up. So whilst in for the annual service the engine was hauled out, all belts, including cam belts, replaced, timing gears pulleys etc. checked over and the valve timing set up 'just so'. The cam covers were removed, re-painted, re-fitted and re-sealed. |
 |
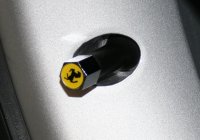 |
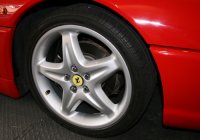
June 2013 : Wheels were in a bit of a state so were completely refurbished - stripped to bare metal, sealed and re-painted. Some spiffy Ferrari dust caps fitted to finish off. Unfortunately these wheels are aftermarket aluminium alloy replicas - the search began for a set of orginal Ferrari Speedline magnesium wheels. |
 |
 |
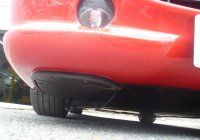
June 2013 : Some very minor scuffs under the rear edge of the off side side skirt were repaired and repainted as was the front edge of the off side rear wheel arch where the lacquer had just started to lift. The exhaust heat shield in the engine bay was also given a lick of paint. |
 |
 |
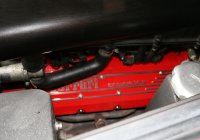
June 2013 : The silver detailing on the air intake manifolds had become worn and dull and, in parts, missing so it was all repainted and the manifolds and air filter boxes spruced up. |
 |
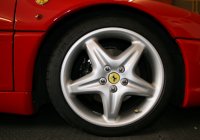 |
March 2014 : The long search paid off and, in November 2013, I managed to secure a set of secondhand original Ferrari Speedline magnesium wheels and had them completely refurbished. After a further long search, I found a set of Michelin Pilot Super Sport tyres in the correct sizes and had the combination fitted to replace the replicas which were shod with Pirelli tyres. |
 |
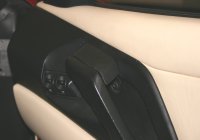 |
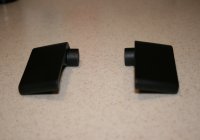
November 2014 : The issues with the interior trim were addressed and the seats, door cards, handbrake housing/trim and instrument binnacle were removed. The first job tackled was the inner door handle release levers which had succumbed to the inevitable Ferrari problem of becoming sticky. The levers were refurbished by completely stripping them back and refinishing using a black PlastiDip coating. |
 |
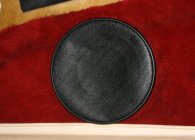 |
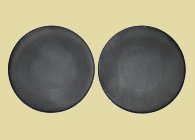
November 2014 : The metal speaker grills in the lower door cards had become worn from footwear being scraped against them when entering/exiting the car. The grills were removed, sanded back, throughly cleaned, primed and treated to a new coat of satin black paint. |
 |
 |
November 2014 : The trim gaiter around the handbrake had become detached inside the housing and had begun to flap around and look untidy. The trim panel was removed and the gaiter re-attached. The trim leather was then throroughly cleaned and reconditioned before refitting. |
 |
 |
December 2014 : The instrument binnacle leather covering had shrunk over the years exposing the underlying binnacle construction on the rear edge and looked unsightly. The binnacle was removed, the instrument/dials extracted and the binnacle completely recovered in black leather with contrasting red decorative stitching. |
 |
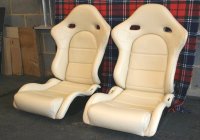 |
December 2014 : The worn driver's seat bolsters had been recoloured (see above) but they continued to wear and discolour. In addition the leather quality on some of the seat facings was not great and the leather shading was a bit variable from panel to panel. Both seats were removed and completely retrimmed in matching 'crema' coloured leather with contrasting red decorative stitching. |
 |
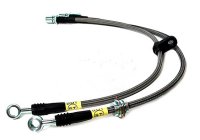 |
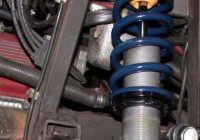
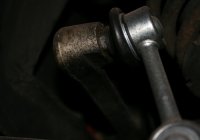
June 2015 : The rear adaptive dampers had started to 'weep' so were replaced. The rear flexible brake hoses were replaced with braided hoses to match those already fitted to the front. |
 |
 |
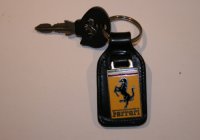
September 2016 : The main ignition key had always had the silver cavalino missing. Having spotted a correct sized cavalino at an eBay model shop I purchased one for a couple of quid and set about resetting it back into the key. I also purchased another (very expensive) blank key with cavalino from the US and had that blade cut for the car. |
 |
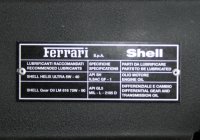 |
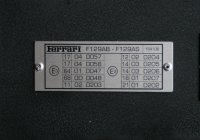
June 2017 : The search for the missing type approval plate for the engine bay was abandoned and a company commissioned to produce a detailed replica correct in all aspects for the type and build of the car. A 'Shell' lubrication plate was also purchased and fitted at this time to, at long last, complete the engine bay trim. |
 |
 |
May 2018 : The car refused to start and it needed all the suspension bushes and drop links to be replaced (MoT advisories) plus an engine-out cam belt service. It was shipped (trailered) to Migliore Cars in Bromsgrove for the work - the failure to start was traced to an errant relay. |
 |
 |
May 2018 : Migliore Cars was also chosen as they are very near to Redditch Shotblasters who worked with Migliore Cars to powder coat the cam covers to the correct hue and crackle finish. |
 |
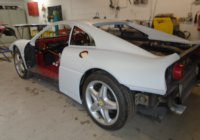 |
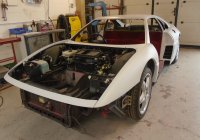
March to September 2019 : Time to get a bit of corrosion on the scuttle below the windscreen and butresses repaired together with a number of other paint blemishes and stone chips. All glass was removed for rectification work and a complete body respray. The car had also developed a transient flashing of the bank 1-4 slow down warning light followed by a quick flash of the engine warning lamp - this was traced to a deteriorating main fuse/relay board (thought to be due to previous poor installation of more than one tracker) which was replaced. Car was SORN for this period. |
 |
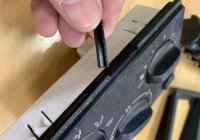 |
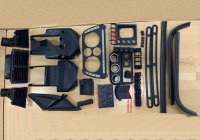
April to August 2019 : Also by this time pretty much all the soft touch controls had further degraded into a sticky mess. Whilst the car was stripped down for repair and repainting all the interior soft touch trim and controls were removed and sent to StickyRx in the US for complete repair and refinishing. |
 |
 |
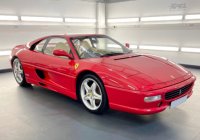
May 2020 : The new paintwork was professionally cleaned, decontaminated, machine polished and sealed with a GTechniq Crystal Serum Ultra ceramic coating (10H hardness) topped off with two coats of hydrophobic EXOv4. Wheels were cleaned, decontaminated and coated with C5 Wheel Armour and internal leather seats, trim and carpets were cleaned and then treated with either L1 Leather Guard or L1 Fabric Guard as appropriate. The treatment comes with a 9 year guarantee and was undertaken by Azuri Car Care in Stevenage |
 |
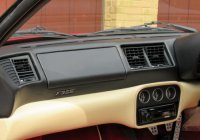 |
June 2021 : The leather on the dash had started to shrink and 'bubble' in places and the trim on the passenger air bag was always a bit suspect. I had also noticed some wonky stitching on the dashpod and also some of the stitching on the seats was not perfect. It was booked into Awesome Classic & Custom for a complete retrim of the seats and dash with some custom embroidery on the seat head rests. This completes the major fettling and upgrade of the vehicle. |
This page will be updated as further work is performed over time |